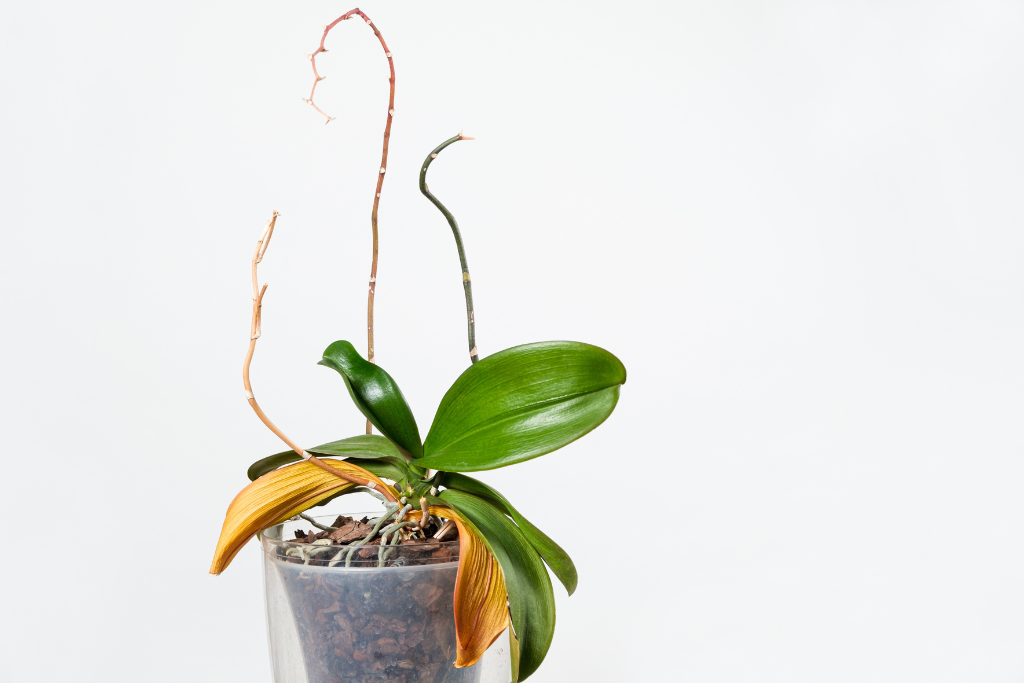
There are many different species and genera of orchid, all with varying requirements for their care and ranging from different habitats, though most come from either tropical forests, semi-desert regions or tundras. They like to wrap around trees, which is why we refer to them as epiphytic. Epiphytes can be slightly harder to care for than terrestrial plants, so you might wonder, ‘why is my orchid stem turning yellow’? This is a common problem, and I’ll help you diagnose it!
Due to their epiphytic nature, orchids can be pretty finicky when trying to care for them in a home. They get nutrients and moisture from the air, rain and water in nature, and it isn’t easy to replicate their habitat inside our own houses – especially if you don’t want to turn one of your rooms into a complete terrarium!
So, because of this, you might find that your orchid will put out a few troubling signs. The yellowing leaves and stems, dropping of leaves or early flower loss. In this article, we’re going to focus primarily on the orchid stems turning yellow. In my experience, this is one of the least worrying problem signs to run into, but it should still be diagnosed and treated as soon as possible to ensure the health of your orchid!

Why Is My Orchid Stem Turning Yellow?
1. Brightness/Light
Without light, plants would be doomed – and so would we! Light is crucial in photosynthesis, which plants use to produce their food. They use this process to get established and grow, allowing them to carry out their essential functions and put out beautiful flowers – especially orchids. Phalaenopsis orchids are known for their flowers, and if you’re taking good care of them, it’s likely that you’ll get more than one bloom out of them per year.
But light can also be harmful to plants too. Excessive amounts of direct sunlight can burn the leaves of orchids, which can turn their leaves a yellow or reddish color, indicating that they’ve been damaged. This can have knock-on effects on the entire orchid, turning the stem of the orchid yellow.
In nature, orchids live under dense canopies of trees, filtering the sunlight and giving them just enough to thrive. So to take care of our orchid correctly, it’s best to try and replicate this as much as possible.
Positioning
I like to keep my orchids on a north-facing windowsill where they seem to be doing well. Some growers will opt for east or west windowsills; however, beware that the intensity of the sunlight in the morning might be pretty high on east-facing windowsills. South-facing windowsills are usually not suitable due to the amount of light, but as long as you give the orchid a bit of distance away from the direct sunlight, it should be okay!
Overall, it’s best to place your orchids in a position where they’ll receive filtered or indirect sunlight. Some species can handle direct sunlight more than others, such as Dendrobium and Vanda, while others, such as Phalaenopsis, Paphiopedilum, Miltonia and Oncidium, can’t. If you’re looking for orchids in between these two categories, you could opt for Dendrobium (which is quite versatile in terms of light intensity), Cattleya or Brassia.
Some growers like to use sheer curtains, which are made of a transparent material and act as a light filter, allowing light to get into your room but soften it. This will work beautifully for your orchids and might even help your home decor! Now that’s a win for both you and your orchid.
Insufficient Light
Even though I have just stressed how important it is to ensure your orchid doesn’t get sunburnt from too much light, it’s also critical to ensure that it still has enough light. Many new orchid growers will position their orchids in unsuitable places, such as a bathroom or an entrance to a house, which might need more light. There are many other factors to consider, such as humidity, temperature and sudden temperature changes.
As a rule of thumb, it’s advised that your orchids get around 6-9 hours of light per day. If your orchid isn’t receiving at least 6 hours per day, it’s likely that you’ll find that the stems will begin to yellow, and the leaves may too. This is a pretty important sign to get your orchid somewhere with more light. Unfortunately, not everyone can solve this problem though.
If you find that you don’t have anywhere in your home that can give your orchid enough light, it may be worth investing in grow lights. Admittedly, this could be pretty hardcore for new growers, but if there’s no other way of giving your orchid enough light – it’s essentially the only way. They’re not as expensive as some people think to run, but you could consider other low-light plants, such as a snake plant, Chinese evergreen, ivy or pothos.
2. Moisture
I can’t stress enough how much orchids love their humidity. Tropical climates call for tropical conditions, and humidity in those forests can reach around 70-80%. Moisture stress is a common problem to run into, and it can be fixed pretty easily with the right things.
I like to use humidity trays to increase the humidity of my orchid room. These are simply small plant trays filled with grit which I water occasionally. The light will evaporate the water on the grit, increasing the humidity around the orchid. Inexpensive and easy to maintain, these make for excellent alternatives to bulky and expensive methods such as humidifiers.
Another way to increase the humidity around your orchid is by misting it. This should only be done early in the day to allow the water to evaporate from the leaves. Otherwise, this could lead to the rotting of leaves. It’s crucial that you try to keep the leaves of your orchids dry overnight, especially if you have watered the orchid. A buildup of water for a long time can lead to crown rot, which can be harder to treat than a yellowing stem!
If you’re a bit more dedicated to your orchid, you could invest in a humidifier. These can get quite expensive, but they’re a foolproof way of increasing the humidity in your home for your orchids. Just beware that keeping your room too humid for an extended period of time without proper airflow can promote mould and dampness, so make sure to keep the humidity at a suitable level.
The aerial roots usually indicate signs that your orchid isn’t getting enough moisture. If they look brown and paper-like instead of green and plump, this is typically a sign that your orchid isn’t receiving enough moisture.
3. Post-Flowering Stress
We all need a break from time to time, and so does your orchid. Flowering is a difficult chore for any plant, as it takes up energy to produce seeds and keep those beautiful flowers blooming. Therefore, you’ll find that your orchid might be a bit stressed, and the stems (flower spikes) may begin to yellow. This is normal, and it’s not really anything to worry about; the orchid just needs to get its energy back!
You might find that if you leave the flower spike, orchids such as Phalaenopsis might even push out another bloom if it can! However, if you notice that the overall health of your orchid seems to be suffering from the yellowing stem, it’s best to remove it by pruning it about 1 inch above the node closest to the crown.

4. Feeding
Surprisingly, plants need feeding too! You might think they get all the food they need from photosynthesis, but I’m afraid that’s not right. Plants need fertilizer to get enough nutrients to survive and grow; we should supply them with this regularly. The three primary nutrients plants need are nitrogen, phosphorus and potassium.
Nitrogen will drive the overall growth of the plant, phosphorus will encourage the development of fruit and flower buds, and potassium helps transport water and nutrients around the plant. These are the main nutrients, but others, such as magnesium, are vital for flowering plants such as orchids! We can supply orchids with these nutrients with special fertilizers designed for orchids.
General fertilizers used for other plants are usually unsuitable for orchids, as they typically contain a more significant amount of one nutrient than the other, while orchids prefer a balanced ratio. It may burn their roots, which can lead to the death of the orchid. You can find orchid fertilizers for relatively cheap in garden centers or online.
Orchids that are deficient in nutrients will display a variety of signs, such as the yellowing of a stem or discoloration throughout the entire plant, such as in its leaves. So, it’s essential that we fertilize orchids regularly – about once a month or more frequently, depending on the species and its tolerance. Make sure to follow the instructions on the fertilizer, diluting it properly to avoid burning the roots of the orchid, which are typically quite sensitive.
5. Unhealthy Roots
In all plants, roots will dictate the general health of the plant. Roots are the hearts of plants, and if they become unhealthy, chances are that the plant will tell you or simply just die. With orchids, this is true.
Problems can arise in the roots from factors such as overwatering, underwatering and over-fertilizing. These can get pretty bad if the issues aren’t solved quickly, especially with overwatering and underwatering.
Overwatering
It’s essential to find the right balance of water for your orchid. Otherwise, the roots will suffer terribly. Overwatering can starve the roots of oxygen, leading to root rot. Root rot will show in the plant in the form of dying leaves and stems, and you might not even notice it occurring if you don’t check the roots of the orchid.
Orchid roots should be plump and bright instead of mushy, crumbly, brown or dry. If you notice that they aren’t healthy, you should alter your care routine accordingly. To prevent overwatering, I like to stick my finger an inch deep into the soil. You should hold off on watering if it’s still soggy until it dries out slightly.
Underwatering
Another common scourge of orchids is underwatering. Many growers don’t water their orchids thoroughly, only using small amounts of water. It’s best to water your orchid every 7-10 days thoroughly, but I’m not particularly eager to follow a strict schedule. I water my orchids when their soil has started to dry out, never letting the soil go completely dry.
Letting an orchid completely dry out can kill it quickly, and you’ll notice that the leaves and stems may begin to brown. If you think that you’ve underwatered your orchid, it’s best to submerge it in water for about a minute, helping it get as much water as possible to its roots. Don’t constantly water the orchid after this – ensure only to water it when the soil begins to dry out. Otherwise, you’ll overwater the orchid!
Soil Medium
Orchids care about the soil they’re in more than other plants. They need a well-draining, airy mix. Otherwise, their roots will fail to do well. Soils such as compost will hold too much water and are too heavy on the roots, so it’s best to use a mix such as sphagnum moss, shredded bark and perlite instead. It’s best to ask other growers in your area or country what they’re using, as some soil mixes might break down quicker in different climates.
6. Temperature
In their habitats, orchids aren’t often exposed to drastic temperature changes. Tropical forests usually stay at a constant temperature year-round, only occasionally varying by a few degrees. Therefore, we shouldn’t expose them to massive temperature changes in our houses either.
This can be avoided by keeping your orchids away from things such as windows or doors opened frequently, letting in a draft which can affect the room’s temperature. Abrupt temperature changes can soon damage the plant, leading to the yellowing of stems.
To avoid this, keep your orchids in positions where the temperature is stable. I have a room dedicated to my orchids, but not everyone can do this. Try to keep them away from large windows or doors you open frequently, and hopefully, your orchid will be okay!

7. Harmful Minerals
Over time, a buildup of harmful minerals may occur in the soil of your orchid. This happens typically due to unsuitable tap water, but this can take around a month or more to set in. An example would be salt, which is usually responsible for a few problems, such as the yellowing of orchid stems.
If you find this a common problem in your orchids, it might be worth switching to using distilled water or rainwater. Using too much fertilizer can also cause a buildup of harmful minerals in the soil, so it’s important to thoroughly water the orchid every once in a while to drain them out.
Final Thoughts
So, if you’re wondering, ‘Why is my orchid stem turning yellow?’, it’s likely due to the 7 factors that I listed above. If I were you, I would work through the list and consider each possibility. Check the roots of your orchid, ensuring they are healthy.
Frequently Asked Questions (FAQ)
Should I cut my yellow orchid stem?
If it’s a flower spike, I’d recommend holding off on cutting it unless it’s causing more problems for your orchids. Often, orchids may be able to produce another bloom from the flower spike, and the stem may have turned yellow as it’s used up quite a bit of energy. Though, if it’s a stem of the orchid, it may be worth pruning it – especially if it starts to turn black or brown, which could be a sign of fungal infection. Make sure to sterilize your pruners before each cut if you prune the stems. Otherwise, it can promote the spread of pathogens to another part of the orchid, leading to further problems.
How do you revive an orchid stem?
Unfortunately, most parts of plants won’t be able to be revived once they begin to die. However, if it’s a flower spike on an orchid, you might be able to revive it. Keep up with care for the orchid, making sure to water it frequently with the correct amount, ensuring it gets a good amount of light and feed. Hopefully, you will see the flower spike begin to turn green again in a few weeks, but if it doesn’t, then it may be best to prune it off.
What color should orchid stems be?
Ideally, orchid stems should be bright green and firm to the touch. Unhealthy stems are usually a yellow, brown or black color. However, these colors are typically signs of different problems in the orchid, such as a fungal infection or factors such as underwatering or overwatering. If the stems are mushy to the touch and turning brown, it might be best to prune them before they affect any more of the orchid.
When do I need to repot my orchids?
Orchids will usually put out a few signs that tell you it needs to be repotted. There may be a considerable increase in the number of aerial roots it’s putting out, suggesting that it’s trying to get water and nutrients from elsewhere. This is because there isn’t any more space in the soil medium. The orchid may also look quite out of proportion to the pot, with its leaves getting too big and drooping over the edge of the pot. Typically, these two signs are good enough to suggest that your orchid needs a repot. It’s best to do this when your orchid isn’t flowering, using a free-draining and airy mix and being sure not to disturb the roots as much as possible when you do it.


