The juicy and fleshy center of watermelon melting in your mouth might tempt you to start your watermelon plant. Even though we are all for the idea, have you taken enough time to learn all there is to know about the process?
Don’t worry because in this comprehensive guide, we will cover the different watermelon growing stages. But why is that important?
Learning about watermelon growing stages can help track your plant’s progress. It can also help you recognize if something is wrong so that you can take measures at the right time.
However, watermelons have different varieties. People assume that different types might have different growing stages. Even though there may be a slight variation in the timeline, the overall process remains the same.
Therefore, this guide is an umbrella that covers the following:
- Black Diamond watermelon growing stages
- Sugar Baby watermelon growing stages
- Crimson Sweet watermelon growing stages
- Charleston Gray watermelon growing stages
- Honey Heart watermelon growing stages
But before moving forward, it is important to set your expectations right. Let’s answer the most important question first.
How Long Does It Take To Grow Watermelons?

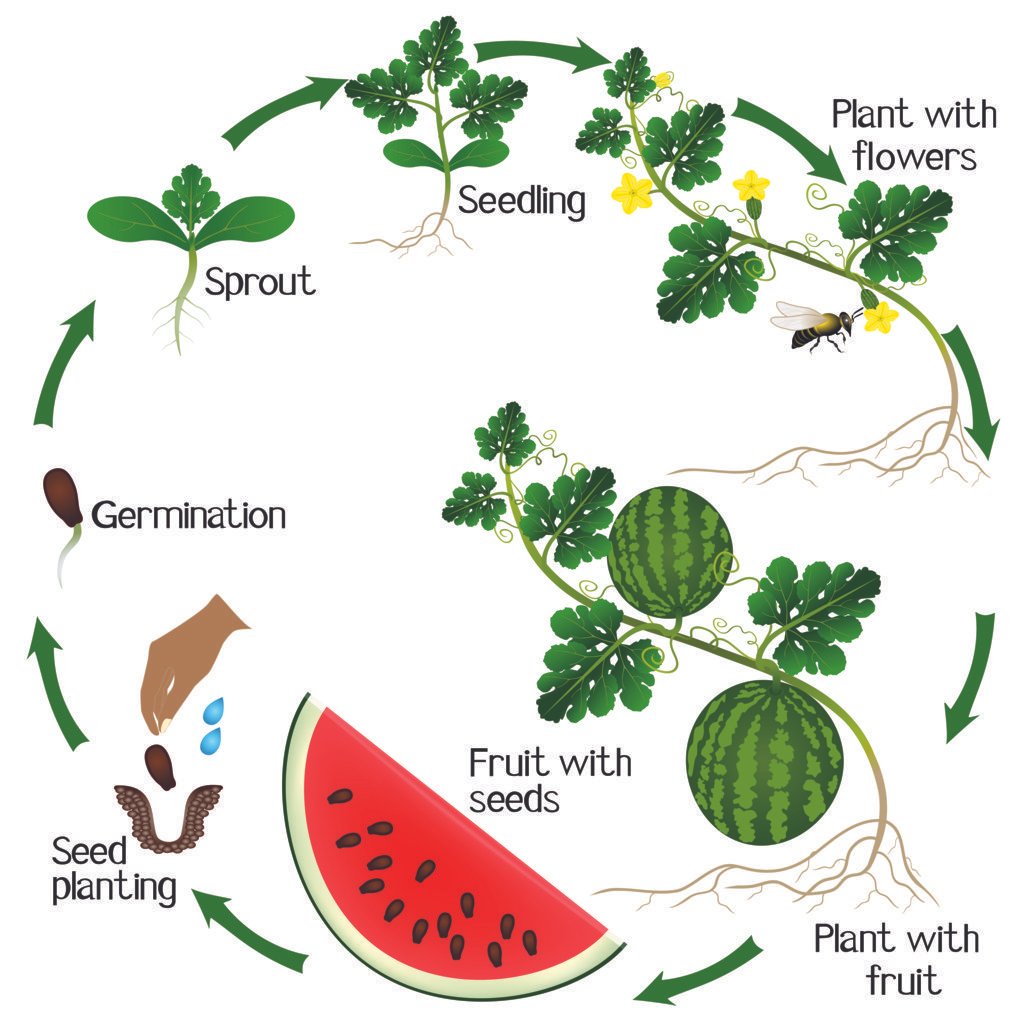
Generally, watermelons take about three months to ripen fully. Some varieties can also take up to four months. It starts with seed germination, which leads to the growth of vines and leaves. This process takes up the first two months. Toward the end of the second month, flowers start to bloom and pollinate. The pollinated flowers set fruit in the third month, reaching maturity by the month’s end.
The smaller the variety, the sooner it will mature. Moreover, watermelons are annual plants that last the entire growing season before dying off. If grown correctly, watermelons can yield ample produce.
The Nine Watermelon Growing Stages
We can divide the growing process of watermelon into nine different stages. Let us closely examine these stages and some things to remember during each phase.
1. Planting
Watermelon Variety
The first stage of watermelon growth begins with planting, which in turn starts with the right choice of watermelon variety. The variety you choose is going to be influenced by the regional climate.
If you live in a colder region, it is better to choose an early-season variety. Sugar Baby and Yellow Baby are some early-season recommended varieties. The reason for selecting early season variety is that watermelons need sufficient sunlight to mature. Early-season varieties can mature in a shorter period, which means they get adequate sunlight even in colder regions.
Moreover, in colder climates, you should ideally start your watermelon seeds inside about four weeks before the last frost of the season. Once they sprout, transfer them to the soil when its temperature is at least 70 degrees Fahrenheit.
Conversely, you have more options vis-a-vis watermelon varieties if you live in warmer regions. Your watermelons will get plenty of sunny days, whether standard or early-season varieties.
Seed Chitting
Chitting is the practice of germinating seeds before they come in contact with soil. It is better to chit watermelon seeds before planting. It helps you identify viable seeds so that you can have a hassle-free growing experience and a better yield. Simply place the seeds on a damp paper towel, transfer them to a container, and cover them with plastic wrap. You’ll notice the seeds forming roots in about three days.

Afterward, place the seeds one inch deep and almost six feet apart in a loamy, well-draining soil mix. This will give them enough space to spread and grow properly. You can also use trellises to utilize vertical space. Water the seeds thoroughly, and ensure that the plants get 8-12 hours of bright sunlight every day.
2. Seed Germination
Germinating is the second stage and begins when the seeds are first planted in the soil. Seeds planted in soil with a temperature lower than 70 degrees Fahrenheit will not germinate.
You should also ensure that the seeds you just planted are getting enough water. You should give watermelon seeds 1-2 inches of water every week. The soil should feel moist but not soggy. In about 3-12 days, the seeds will reach complete germination, and you’ll notice tiny sprouts breaking the ground.
3. Sprouting
The first two leaves after sprouting are known as embryonic leaves.

These little seedlings are quite vulnerable. Therefore, it is essential to protect them from harsh winds and animals. Keeping the soil moist and watering 1-2 inches every week is also important at this stage. Overly wet or soggy soil can also kill the plant.
4. Vegetative Phase
The vegetative phase is the period of growth that lasts from germination to flowering. After sprouting, the plants will start to grow at a faster rate. You’ll notice the first set of true leaves in about ten days. These leaves will begin photosynthesis to provide the plant with much-needed energy essential for further growth.

At this point, the rate of growth will speed up even more. The leaves will become more prominent in about two weeks, and the vines will grow up to 12 feet. In about a month, more vines will appear. This means that your watermelon plants have entered the next growth stage, i.e., branching.
5. Branching
When the appearance of new vines or branching occurs, it is vital to keep up with the nutritional needs of your watermelon plant. You can do that by adding ½ cup or 120 ml of bone meal to the soil. The key is to mix it gently into the soil without letting it damage the roots.
The plant will grow more rapidly at this point, so you’ll have to increase the watering frequency too. 1-2 inches of water twice a week will be sufficient. As more and more vines keep appearing, your watermelon plant will start to bloom, entering the sixth growth stage.
6. Flowering and Pollination
Watermelon vines bear female and male flowers. Male flowers have the pollen that is necessary to bring about pollination in the female flowers. Male flowers appear first, followed by female flowers. Some watermelon plants also contain male and hermaphrodite flowers, but they still need a pollinator to start pollination.
Fruit sets after successful pollination. Generally, bumblebees, bees, and wasps are reliable pollinators. However, adding honey bees is also recommended when planting in large fields. You can also aid pollination by transferring pollen from a male flower to a female flower with a q-tip.
7. Fruit Setting
A small bulge behind a female flower is one of the first signs of fruit setting. Gradually, this bulge will get bigger and grow into a watermelon fruit. It is wise to fertilize the soil with a low-nitrogen fertilizer at this point. A standard 5-10-10 fertilizer will do the job.

Watering can also impact the taste of your fruit. If you want it to be sweeter and less watery, limit watering to an inch per week.
8. Maturity and Harvesting
Watermelon fruit can take about a month to mature. However, you can keep an eye out for signs that can indicate the level of ripeness and sweetness, such as:
- Oblong watermelons that have a dark green color and produce hollow sounds are believed to be the sweetest of the bunch.
- A yellow spot on the rind indicates that the fruit is fully ripe.
- Webbing is also a good sign as it shows the fruit is sweet.

These signs are not set in stone, and different varieties might have different indications. Therefore, it is important to do due research based on the seed variety.
9. Drying
The vines will stop producing fruit and dry out toward the end of the season. It is a part of the watermelon plant’s life cycle and nothing to be discouraged from.
In the meantime, collect as many seeds as possible from the fruit and let them dry. Once they harden, you can plant them again at the turn of spring to have sweet and juicy watermelons next year.
Watermelon Plants: Diseases and Pests
Watermelon plants can face diseases and pests that can affect their growth stages. Here are some of those problems you should keep an eye out for.
Pests
Watermelon plants are susceptible to pests, and some of the most common offenders are:
- Cucumber beetles
- Cabbage loopers
- Aphids
- Thrips
- Spider mites
A standard insecticidal soap is sufficient to get rid of most of them. However, if the infestation is too widespread, you can pick them off by hand. A novel way to eliminate them is to introduce their natural enemies, like soldier beetles and ladybugs, to kill cucumber beetles and aphids, respectively.
Diseases
Here are some of the most common diseases watermelon plants are affected with.
- Anthracnose
Anthracnose presents itself as small brown spots that gradually turn black. This disease can potentially kill the whole vine if not handled promptly. It develops in humid and warm conditions. Some recommended ways to deal with anthracnose are:
- Planting disease-resistant varieties
- Using fungicides
- Crop rotation
- Powdery Mildew
Just like anthracnose, powdery mildew also develops in humid conditions. If your watermelon leaves are constantly wet, they are at a higher risk of getting powdery mildew. It appears as white and powdery spots on the vines, upper leaves, and young plants.
Powdery mildew will turn brown and kill the plant if left untreated. The best way to deal with it is to use a fungicide as soon as you see it on your plant’s leaves.
Final Words
Growing a fruit with effort and dedication can be immensely rewarding. Therefore, when it comes to watermelons, learning about growing stages can be helpful for a problem-free growth. Any deviation from the stages and timeline mentioned above should tell you something is wrong.
It will also help you be patient and set your expectations right. If any of the pests and diseases interfere with the growing process, you’ll know how to handle them too. Ultimately, you will have a fulfilling and rewarding growing experience that will end with you, your friends, and your family enjoying juicy and sweet watermelons!


